How to connect to Booking.com?
There are 3 different scenarios:
Connect to Booking.com - complete new connection/create a new booking.com account
Create a new property on your already existing account on Booking.com
Map a property with an existing listing on Booking.com
Below you will find all cases explained step by step.
Before starting:
First, Make sure all the essential Rental details have been filled out. Learn more about this in the dedicated article or contact us through the support section.
Booking.com requires a Kitchen for each listing.
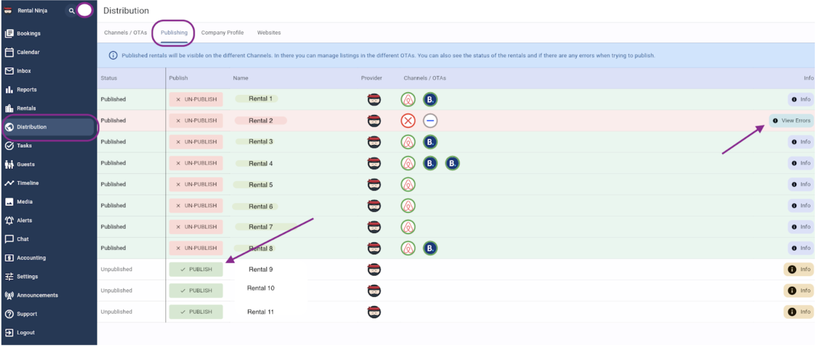
Make sure that the Rentals are publishable. You can check this in the Distribution Section - Publishing tab. If a Rental is not yet published, you can make it publishable here by clicking on Publish. If any Rental provides any errors after that, click on the View Errors button to see what actions need to be taken to be able to connect the Rental to the channels.
Connect to Booking.com - complete new connection:
Go to Rental Ninja - Distribution
Connect to Booking.com if not yet done
Synchronize your first property OR Add more properties
A dialogue window appears with the question if the property is already published in Booking.com. If the property is not listed in Booking.com, click No and follow the next steps. Instead, If the property is already listed on Booking.com, please follow the steps indicated in "Map a property with an existing property on Booking.com".
Since you do not have a Booking.com account yet, you'll need to sign a contract with them, click on the I don't have a contract with Booking.com yet that shows in this step.

Fill in the form. Some data may be pre-filled based on what you have provided in your company profile (distribution - company profile). Confirm your willingness to sign the contract by ticking the checkbox. Click Next.
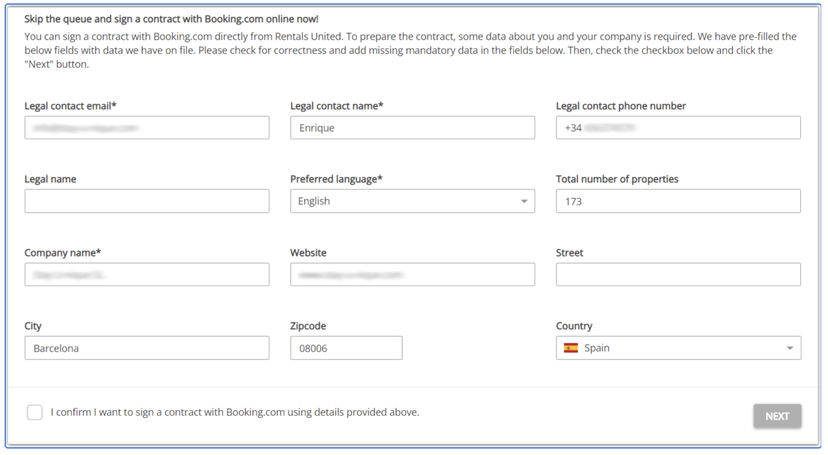
Booking.com will generate a Legal Entity ID (LEID) for you and you can start adding new properties immediately (follow the steps below in Create New Properties). Once the contract is signed, your properties will go live on Booking.com within 24 hours. Your listings will not go live until you sign the contract.
Check your emails for a message from Booking.com. If you cannot find it in your inbox, check the SPAM folder. Follow the instructions and sign the contract online.
Create a new property on your already existing account on Booking.com
Important Note ! If you want a multi-unit set-up (several room types in the same hotel), you will need to create the listing in Booking.com first and then map it in Rental Ninja.
Go to Rental Ninja - Distribution
Connect to Booking.com if not yet done
Synchronize your first property OR Add more properties
A dialogue window appears with the question if the property is already published in Booking.com. If the property is not listed in Booking.com, click NO and follow the next steps. Instead, If the property is already listed on Booking.com, please follow the steps indicated in "Map a property with an existing property on Booking.com".
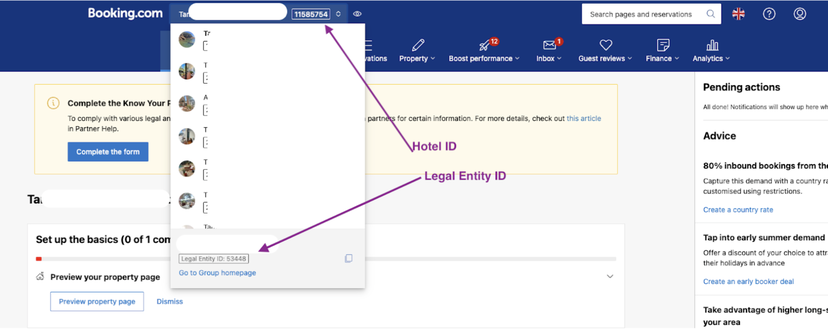
Fill out the Legal Entity ID of your Booking.com account.
Click on Next
Start typing the property name or scroll down through the dropdown list. It is possible to push multiple properties at once.
The content quality is analyzed. The process should take up to a few minutes.
If the properties are ready to publish, adjust the mark-up for each of your properties. You can additionally set up the booking mode for each property: Instant booking or Request to book. If the properties are not yet ready to publish, please correct the indicated. After correcting them, wait for about 10 minutes and retry.
Click the Publish properties button.
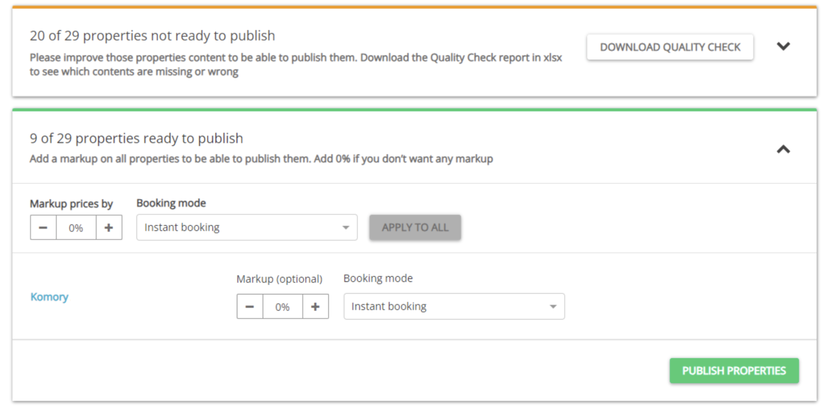
The published properties enter the Pending status. The channel reviews your properties and their status will be updated automatically. It can take up to 24 hours before the pushed property is visible in the Booking.com dashboard.
To activate the connection: you must activate your Rate Plan in Rental Ninja. Go to: Distribution > Booking.com > Go to the listing > Manage Rates > Activate
If the Rate plan is active, but the Rental is not bookable on Booking.com after 24 hours: go to the Booking.com extranet and open the Calendar. A button should appear right below the main menu allowing you to open the calendar.
Note for properties on new locations:
Whenever you add properties located in a country which is not a part of your current contract, you will see this notification in Property Settings:
You need to sign an additional contract with Booking.com to push properties in this country. Check your email for the message from Booking.com and follow the instructions.
Booking.com will send you an email with instructions on how to extend your contract with the new location. Follow these instructions. Once you are done, come back to Property Settings and retry the error to complete the procedure. Then, you will be able to list properties in the new location.
Map a property with an existing listing on Booking.com
First step to be taken is on Booking.com's extranet.
If this action is not done, you won't be able to connect the property to Rental Ninja.
Go to the Booking.com Extranet - open the listing - and add QuickConnect as the Connectivity Provider ( ACCOUNT > Connectivity Provider)
This is to be done for each listing separately.
![]()
This connection request is to be accepted, during business hours it should take about 2-4 hours for it to be approved. (During the weekend, it could take slightly longer)
After waiting for about 2-4 hours. Go to Rental Ninja > Distribution
Connect to Booking.com if not yet done
Synchronize your first property OR Add more properties
A dialogue window appears with the question if the property is already published in Booking.com. Click Yes and follow the next steps
It will require either the hotel ID. You can find it in your Booking.com account:
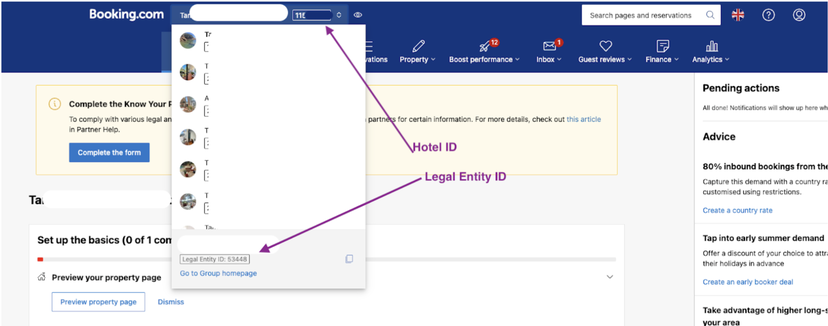
Click on Next
Choose the Rentals you'd like to connect to this Booking.com listing. One or more properties may be mapped to one Booking.com listing.
Save & Next
Indicate the Mark up
Click on Connect Property
Finally, you must activate your Rate Plan: Manage Rates > Activate
If the Rate plan is active, but the Rental is not bookable on Booking.com after 24 hours: go to the Booking.com extranet and open the Calendar. A button should appear right below the main menu allowing you to open the calendar.
![]()
IMPORTANT! In case you have any future bookings, move to the next section to import the future bookings. This is a very important step. If you don't import bookings, overbookings may happen.
Import Booking.com Bookings
If you already had confirmed Bookings on your Booking.com account before connecting to Rental Ninja and you want to import them to Rental Ninja, you can do so the following way:
Go to Distribution - Booking.com
Hover over the 3 dots "···"
Click on Import Booking.com Bookings
This is to be done per property.
It will import all current & future confirmed Booking.com Bookings of the respective listing.
Notes:
If the Rate plan is not automatically activated > click on Activate inside the Rate Plan. For this go to the listing in the Booking.com integration in the Distribution center > Manage Rates > Activate
If the Rate plan is active, but the Rental is not bookable on Booking.com after a few hours: go to the Booking.com extranet and open the Calendar. A button should appear right below the main menu allowing you to open the calendar.
Due to a strong Booking.com policy to prevent duplicates, it is not possible to re-create the property's connection with the channel (archive and connect again). Archiving a property does not resolve this, as the connection between Quick Connect and Booking.com is still maintained in the background. In other words, it is not possible to publish a listing a 2nd time. Thus, If you want the re-reate a new listing in booking.com, you will need to change its name, coordinates and address in Rental Ninja before pushing it to Booking.com
