Portal de huéspedes en línea/Configuración de alquiler
Cómo configurar sin esfuerzo el módulo de huéspedes para un portal de huéspedes en línea interactivo y proporcionar una excelente experiencia al huésped
En este artículo, le mostraremos cómo configurar el Portal de Huéspedes. Para ser exactos, le mostraremos qué configurar en la Configuración de Alquiler. Antes de hacerlo, asegúrese de haber configurado la Configuración general del módulo de invitados.
El formulario de PreCheck-in junto con el Portal de Huéspedes automatizará las comunicaciones previas a la llegada y se asegurará de que tenga todos los detalles del huésped antes de la llegada. Le ahorrará muchos correos, mensajes de whatsapp y llamadas telefónicas innecesarias. Para obtener más información sobre el formulario de PreCheck-in y el flujo de comunicación con sus clientes, consulte este artículo.
Cómo configurar su portal de huéspedes en línea para sus alquileres a corto plazo
Paso a paso para mejorar la experiencia de sus huéspedes
Vaya a Módulo de Huéspedes - Configuración de Alquileres
Abra un Alquiler haciendo clic en "ver"

Habilite la Configuración de Alquiler para el Alquiler
Complete los detalles de la Persona de Contacto de este Alquiler, para que el Huésped pueda comunicarse con ellos directamente desde el Portal de Huéspedes
Complete los detalles de WiFi (opcional)
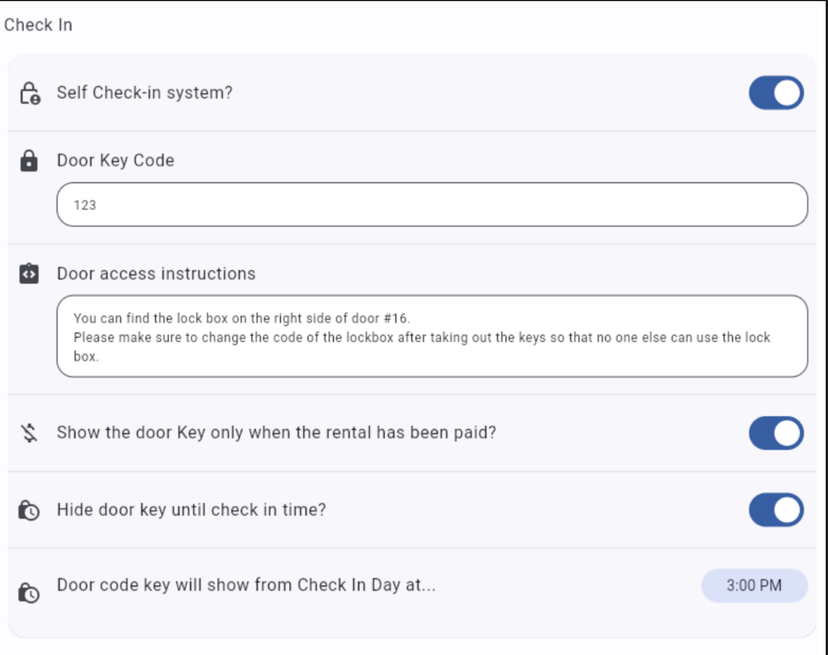
Active + Complete los detalles de Self Check-in (opcional)
Complete un CÓDIGO de llave de puerta > el código fijo de la caja de seguridad con las llaves
Escriba las instrucciones de acceso a la puerta > para explicar a sus Huéspedes dónde encontrar la caja de seguridad y cómo usarla.
Decida si desea que el código + las instrucciones estén ocultos hasta la hora del check-in (personalizable) + hasta que se haya recibido el pago completo del huésped.
El estado de pago se verifica mediante la barra de Pago de cada Reserva en la plataforma. Dependiendo del Channel Manager con el que trabaje, la barra de pago se actualiza automáticamente o no. De lo contrario, puede optar por introducir manualmente los pagos de sus Reservas para realizar un seguimiento de los Pagos recibidos.

Introduzca los detalles de contacto de Mantenimiento (opcional)
Agregue el Control deslizante de Imágenes del Portal de Huéspedes
Estas son las imágenes que se muestran en la parte superior del Portal de Huéspedes. Dependiendo del Channel Manager con el que trabaje, ya recibimos la Imagen de perfil de alquiler de su Alquiler, que se mostrará en el Portal de Huéspedes. Si no recibimos esta imagen, aquí tiene la opción de agregar hasta 3 imágenes para el Portal de Huéspedes.
Si no lo ha hecho en la Configuración general del Módulo de Huéspedes, aún puede elegir activar el Formulario de Pre Check-in desde esta sección.
¡Hecho!
Siguiente paso: Cree las Guías para que sus Huéspedes tengan instrucciones detalladas sobre cómo acceder a la propiedad + cualquier otro detalle relevante.
