Synchronizing Your Nuki Account with Rental Ninja
This guide provides comprehensive instructions on how to connect your Nuki smart lock devices to your Rental Ninja account. By integrating your Nuki account, you can manage your smart locks directly from Rental Ninja, streamlining access for guests and staff.
Overview
The synchronization process involves setting up your Nuki device, linking it to your Nuki Web Account, and then connecting that Nuki Web Account to Rental Ninja. Once connected, all devices within your linked Nuki Web Account will be accessible and manageable from within Rental Ninja.
Prerequisites
Before you begin, ensure you have:
A Nuki smart lock device.
The Nuki mobile application installed on your smartphone.
An active Rental Ninja account.
Stable internet access (Wi-Fi for Nuki device setup, and internet for mobile/web access).
Step-by-Step Instructions
1. Initial Nuki Device Setup
This initial setup phase is performed directly through the Nuki mobile application and is a prerequisite for connecting to your Nuki Web Account.
Power On Device: Ensure your Nuki device is powered on and ready for setup.
Launch Nuki Mobile App: Open the Nuki application on your smartphone.
Connect via Bluetooth: Follow the in-app instructions to connect to your Nuki device via Bluetooth. Ensure your phone is in close proximity to the device during this process.
Configure Device: Complete the basic setup, including:
Setting a name for your device.
Configuring Wi-Fi connectivity for the device.
Note: Detailed instructions for this step are provided by Nuki directly. Refer to Nuki's official documentation for specific guidance.
2. Synchronize Device with Nuki Web Account
After the initial device setup, you need to sync your Nuki device(s) with your Nuki Web Account. This allows for centralized management and is a necessary step before connecting to Rental Ninja.
Access Device Settings: In the Nuki mobile app, ensure you are connected to the device via Bluetooth. Navigate to the device settings.
Navigate to Features and Configuration: Within the device settings, locate and select
Features and Configuration.Select Nuki Web: From the
Features and Configurationmenu, chooseNuki Web.Follow On-Screen Instructions:
If you do not have a Nuki Web Account: You will be prompted to create one. Follow the steps to register a new account.
If you have an existing Nuki Web Account: Log in using your existing credentials.
3. Review Devices in Nuki Web
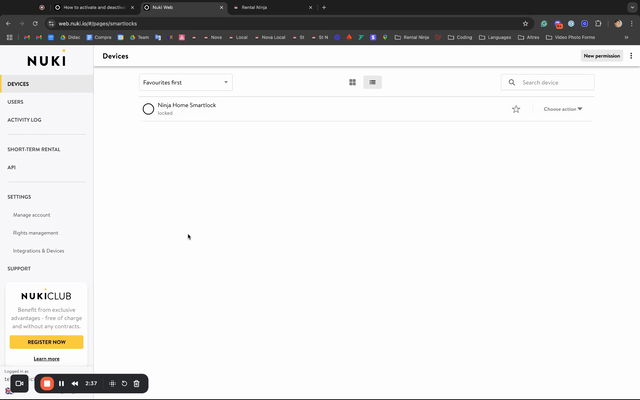
Once your device is synchronized with your Nuki Web Account, you will be forwarded to the Nuki Web interface (typically in a web browser). Here, you can review all connected devices.

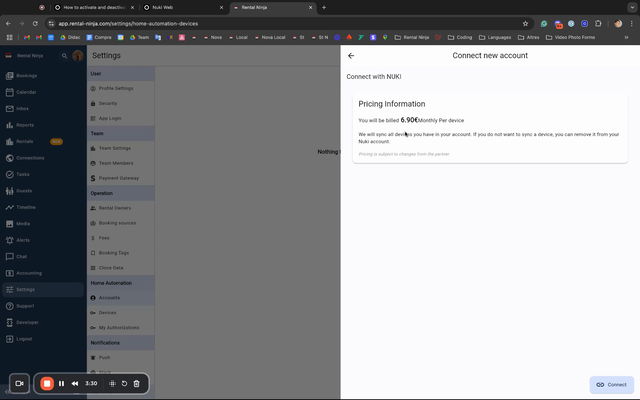
Important: Rental Ninja will synchronize all devices listed in your connected Nuki Web Account. You will be billed by Rental Ninja based on the total number of devices synchronized. Before proceeding to connect your account to Rental Ninja, ensure you remove any Nuki devices from your Nuki Web Account that you do not wish to manage or be billed for through Rental Ninja.
4. Connect Nuki Account to Rental Ninja
Now, proceed to your Rental Ninja account to establish the connection with your Nuki Web Account.

Navigate to Settings: Log in to your Rental Ninja account.
Access Home Automation: Go to the
Settingssection in the Rental Ninja dashboard.Go to Account Section: Within
Settings, navigate toHome Automation, then select theAccountsection.Add Account: Click on the
Add accountbutton.Select Nuki: Choose
Nukifrom the list of available home automation providers.Enter Credentials: Input your Nuki Web account credentials (username and password) in the provided fields.
Accept Conditions: Review and accept the conditions to grant Rental Ninja the necessary access to your Nuki account information. This allows Rental Ninja to retrieve device data and manage locks.
Confirm Connection: Click
ConnectorAllowto finalize the integration.
5. Verify Synchronization and Manage Accounts
Upon successful connection, you will be redirected to the Devices section in Rental Ninja, where your Nuki devices will begin to appear.
View Connected Account: To view details of your connected Nuki account, navigate back to the
Settings>Home Automation>Accountsection.Account Details: You will see your Nuki account listed with:
The name of the connected Nuki account.
The total number of devices synchronized from that account.
The date/time of connection.
Multiple Accounts: You can connect multiple Nuki Web Accounts to Rental Ninja if needed. Simply repeat Step 4 for each additional account.
Device Naming: Device names displayed in Rental Ninja will match the names you configured for them within the Nuki mobile app and Nuki Web Account.
Disconnecting Accounts: To remove a Nuki account and its associated devices from Rental Ninja, locate the account in the
Accountsection and use the disconnect/remove option.
Configuration Options
Billing for Synchronized Devices
Rental Ninja bills for Nuki devices based on the number of devices connected through your Nuki Web account.
Subscription Type | Billing Frequency |
|---|---|
Monthly Recurring | Monthly |
Yearly Recurring | Yearly |
Important: The number of devices billed is determined by the active devices present in your Nuki Web Account at the time of synchronization. Always ensure your Nuki Web Account only contains devices you intend to manage via Rental Ninja to avoid unexpected charges.
Common Issues and Troubleshooting
Issue | Possible Cause | Resolution |
|---|---|---|
Nuki Devices Not Appearing in Rental Ninja | 1. Device not successfully synchronized with Nuki Web Account. | 1. Verify your device is properly synced and visible in your Nuki Web Account. Follow Step 2: "Synchronize Device with Nuki Web Account". |
Unexpected Billing for Nuki Devices | More devices are present in your Nuki Web Account than you intend to manage or thought were synced. | Go to your Nuki Web Account and remove any devices you do not wish to manage or be billed for via Rental Ninja. Rental Ninja bills for all devices in the connected Nuki Web Account. After removing unwanted devices from Nuki Web, the billing will adjust in the next cycle. |
Connection Failed / Error Message | 1. Incorrect credentials. | 1. Verify your Nuki Web account credentials. |
