SmartLock Device Setup and Guest Access Configuration
This documentation provides a comprehensive guide to setting up and configuring SmartLock devices within Rental Ninja, enabling automated keyless access for your guests. It covers mapping devices to rentals, customizing guest instructions, and managing when access information is shared.
Overview and Purpose
Rental Ninja integrates with various SmartLock providers (e.g., Nuki) to streamline guest check-in by automatically generating and sharing access codes or instructions. This guide details the steps required to configure your SmartLock devices, ensure accurate time-based access, and effectively communicate entry information to your guests via email and the guest portal.
Prerequisites
Before proceeding, ensure the following:
You have an active account with a supported SmartLock provider (e.g., Nuki).
Your SmartLock provider account is already synchronized with your Rental Ninja account.
You have at least one SmartLock device registered with your provider.
Step-by-Step Configuration
1. Initial SmartLock Device Setup
To begin setting up your SmartLock device in Rental Ninja:
Navigate to Device Settings:
In Rental Ninja, go to Settings.
Select Devices from the sidebar menu.
You will see a list of synchronized devices from your SmartLock provider.
Configure Device Information:
Click on the device icon (e.g., a lock icon) next to the SmartLock device you wish to configure.
Select Device Info.
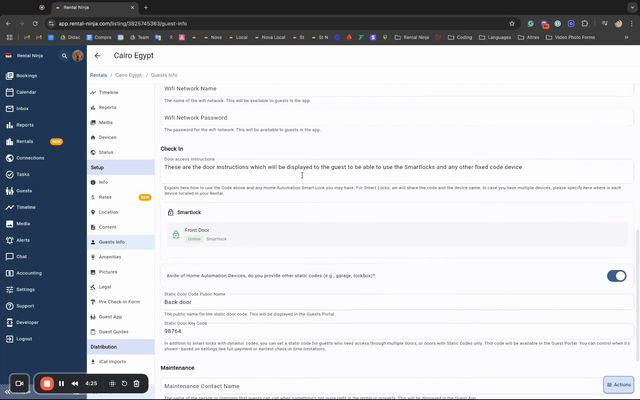
Set Public Name:
The
Public Namefield will be pre-populated with the internal name from your provider (e.g., Nuki).Important: This internal name may not be clear to guests. We highly recommend changing the
Public Nameto something easily understandable by guests, such asFront Door,Main Gate, orSide Entrance. This name will be shared with the guest.
Verify Device Information:
Keypad: Check if the device has a keypad. If it does, ensure the
Keypadsetting is toggled toYes. If this information is incorrect, verify your device's setup directly within your SmartLock provider's platform.Time Zone: Set the
Time Zonecorrectly to match the physical location of your device. Rental Ninja uses this time zone to generate access permissions based on the booking's check-in time.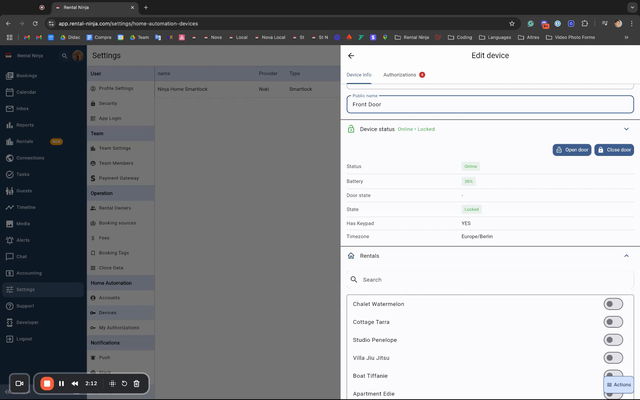
Note: Accurate time zone setting is crucial for correct access code validity.
Map Device to Rentals:
Below the device information, you will find a section to map the device to your rentals.
Toggle the rentals that this device serves.
Scenario 1: Single Rental: If the device provides access to a single rental (e.g., the front door of an apartment), map it to that specific rental.
Scenario 2: Multiple Rentals: If the device is shared among multiple rentals (e.g., a main entrance to a building containing several apartments), map it to all relevant rentals. Rental Ninja will then generate access codes for bookings across all selected rentals.
Save Device Configuration:
Click the Save button.
You will receive a warning confirming that Rental Ninja will begin creating access permissions for bookings associated with the mapped rentals from this point onwards. Confirm to proceed.
2. Configuring Guest Information for Door Access
Once your SmartLock device is set up, configure how guests receive instructions:
Navigate to Rental Settings:
Go to the specific rental that the SmartLock device is mapped to.
Select the Devices section within the rental settings to view all devices mapped to this rental. You can also adjust mapping from here.
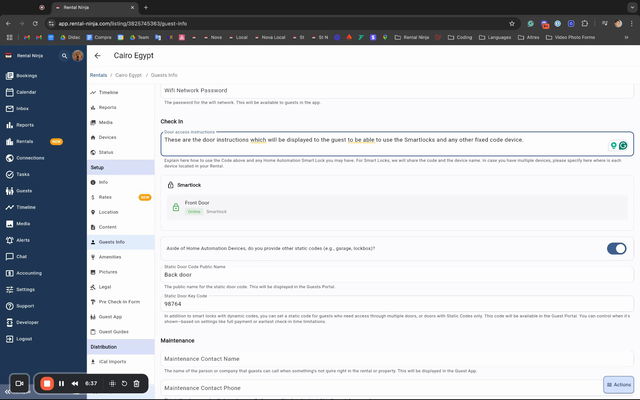
Select the Guest Info section.
Update Check-in Area Information:
Scroll down to the
Check-in Area. You will find three sub-sections:Instructions: General check-in instructions.
Devices: A list of mapped SmartLock devices.
Static Codes: For non-SmartLock access methods like key lockboxes.
Manage Static Codes (if applicable):
If you only use SmartLocks, ensure the
Static Goodstoggle is Off.If you have other access methods (e.g., a lockbox with a permanent code), toggle
Static Goodsto On.Enter the
Name of the device(e.g.,Back Door Lockbox).Enter the permanent
Code.
Provide Door Access Instructions:
In the
Door Access Instructionstext area, provide clear and detailed instructions for guests.Recommendation: Use the
Public Namesyou set for your SmartLock devices (e.g., "Use the Front Door code for the main entrance..."). If using static codes, explain how to use those as well.This information will be shared via email and, optionally, in the guest portal.
3. Configuring Guest App/Portal Settings for Door Access
Control when and how door access information is displayed in the guest portal and sent via email.
Navigate to Guest App Section:
Go to the specific rental that the SmartLock device is mapped to.
Select the Guest App section.
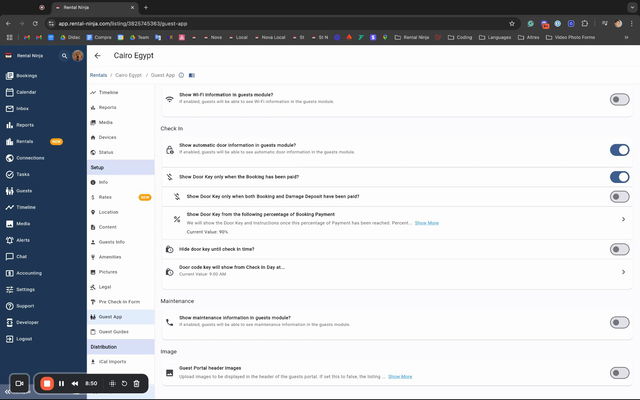
Scroll to the
Check-in Area.
Enable Automatic Door Information Sharing:
Toggle
Automatic Door Informationto On.
Set Payment Threshold for Sharing:
Upon enabling, you'll be asked:
Show the door instructions and the code always or only when the booking has been paid?Default Behavior: If you have a damage deposit configured, Rental Ninja will automatically default to requiring the damage deposit to be paid before sharing access information.
Customize Threshold:
If you do not want to enforce damage deposit payment for access, untoggle the damage deposit option.
A new section will appear allowing you to set a custom payment threshold for sharing instructions.
You can choose between:
Full amount of the booking paidCustom percentage (e.g., 90%)
Payment Threshold Options:
Option
Description
Use Case
AlwaysDoor instructions and codes are always visible to the guest.
When you do not require any payment confirmation before providing access.
Only when the booking has been paidRequires full payment of the booking amount.
Standard secure access sharing, ensuring guests have completed financial obligations.
Damage Deposit paidRequires the damage deposit to be paid. Default behavior if a damage deposit is configured.
To ensure security deposits are secured before access is granted.
Custom percentageRequires a specified percentage of the booking amount to be paid (e.g.,
90%).Useful for scenarios like city taxes charged manually post-check-in, where a small outstanding amount shouldn't block access if the main booking is largely paid.
Click Save to apply these settings. Rental Ninja will now send an email with door instructions to the guest once the defined payment threshold is met.
Guest Portal Specific Visibility:
This section applies only to the guest portal (not email sharing).
You can set a specific time when door access information becomes visible in the guest portal.
Toggle
Don't show it until the check-in timeto On.You can also specify a time that is earlier than the actual check-in time (e.g., if check-in is 11:00 AM, you can set it to 9:00 AM).
Configuration Options
Device Naming
Field | Description | Recommended Value |
|---|---|---|
Internal Name | The name provided by your SmartLock system (e.g., "Nuki Lock 123"). This is for internal identification in Rental Ninja and may not be descriptive for guests. | Not editable; used internally. |
| The user-friendly name displayed to guests. | Clear and descriptive, e.g., |
Access Sharing Payment Thresholds
Refer to the "Payment Threshold Options" table in the "Step-by-Step Configuration" section above for detailed settings.
Common Issues and Troubleshooting
Access Codes Not Generated/Shared:
Check Device Mapping: Ensure the SmartLock device is correctly mapped to the rental associated with the booking.
Verify Payment Threshold: Access instructions are only shared when the defined payment threshold (full payment, damage deposit, or custom percentage) has been met. Check the booking's payment status.
Confirm "Automatic Door Information" Toggle: Ensure this setting is enabled in the rental's Guest App section.
Incorrect Access Times:
Verify Device Time Zone: Double-check that the
Time Zoneconfigured for the SmartLock device in Rental Ninja (under Settings > Devices > Device Info) matches the actual time zone of the device's physical location.
Device Not Syncing / Error with Device:
Rental Ninja relies on the synchronization with your SmartLock provider. If a device is not appearing or has incorrect information (e.g., keypad status), check the device's setup directly within your SmartLock provider's platform (e.g., Nuki app/portal).
Related Features or Articles
Deleting a SmartLock Device:
If you need to remove a SmartLock device from your Rental Ninja account, go to Settings > Devices.
Click the Delete button next to the device.
Important: This action will delete the device from your SmartLock provider account (e.g., Nuki Web) and un-sync it from Rental Ninja. It will no longer be billable or usable within Rental Ninja.
Team Member Permissions for Home Automation:
Control which team members can manage and use SmartLock devices.
Navigate to Settings > Team Members.
Select the team member and go to
Permissions.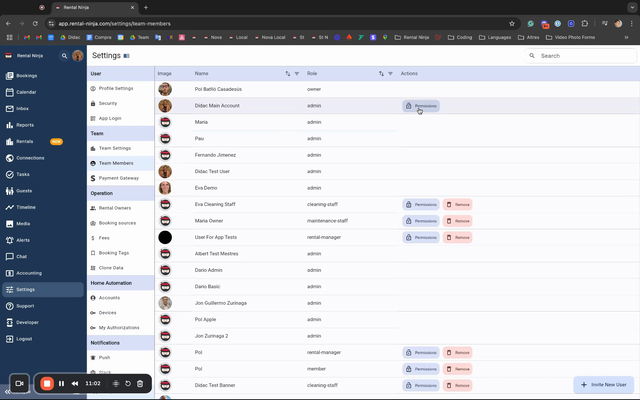
There are two key permissions related to home automation:
Manage settings of home automation: Allows a user to access the Settings > Devices section, map devices, and modify their configuration.
Use devices of home automation: Allows a user to operate devices (open/close doors) directly from a booking page and view whether access authorizations have been created for a booking. This is useful for check-in agents who need to monitor or manually control access without altering configurations.
Managing SmartLock Authorizations from Bookings: (Coming soon in a separate guide)
Learn how to directly view, operate, and manage specific SmartLock authorizations for individual bookings from the booking details page. This allows checking access status and performing manual overrides (e.g., opening/locking the door)
